Now on the Internet you can find unofficial firmware with “clean” Android 7.1 OS for Lumia 520 and 525 smartphones, as well as instructions for installing it. But it is of little interest, since the vast majority of modules do not work in it - camera, Wi-Fi, Bluetooth and others. In addition, the method of installing firmware on an Android system does not allow for reversion to Windows Phone. It is quite possible that a little later enthusiasts will figure out how to solve this problem, but at the moment this is the situation.
Video: Android 7.1 on Nokia Lumia 520
How to install Android applications on Windows Phone and is it possible?

Since the weakest point of Windows Phone has always been the application store with a meager range of content, in 2015 Microsoft decided to open two bridges for quickly porting software from iOS and Android - Project Islandwood and Project Astoria, respectively. With their help, the company planned to significantly reduce the existing gap between the markets of leading mobile operating systems and the Windows Store, as well as increase the number of users of its tiled OS.
While Islandwood only involved editing the code and recompiling iOS applications for their further deployment on devices with Windows 10 Mobile, the Astoria project provided more advanced capabilities - installing and running applications created for the “green robot” directly on devices with mobile Windows. All these tricks could be done thanks to the Android subsystem, present in the “tens” builds for smartphones, but only with software that was not linked to Google Play services.
Initially, Astoria tools were issued to a limited number of developers, but then “quite by accident” they became freely available. Literally immediately after this incident, several ways to install programs from a “robot” to a mobile “Windows” appeared on the network. Everyone could use them, but only the most “hungry” experienced special delight from this. And all because when using programs written on Android, the system slowed down significantly and loaded the phone. This was due to the fact that the OS devoted a large amount of resources to emulating and maintaining the virtual machine in working order. Since Microsoft engineers have not figured out how to fix this jamb, third-party developers have refused to use Astoria to port their creations. As a result, the company had to close the project and cut out the Android subsystem from builds of Windows 10 Mobile newer than build number 10536. This is why now no one can install applications from APK files on Windows phones using existing methods.
From all this we can conclude that now there are no compromise options for users who are not satisfied with the pace of development of Windows 10 Mobile, and are also upset by the situation with the release and support of applications for this operating system. We can only hope that in the near future the big-headed guys will be able to come up with something and arrange a holiday for desperate users.
Modern smartphones and tablets are practically compact computers, that is, similar experiments can be carried out with them, and if they use Android as the operating system, then possible research with the device is almost unlimited.
The only obstacles can be the resource capabilities of the gadget itself and the limited imagination of the user. Below is a description of the necessary steps on how to make a Windows Phone out of an Android device.
Options for implementing the task
There are two main methods to turn an Android device into a Windows background:
- Use for these purposes a specially developed Windows emulator that operates in the Android environment;
- Install Windows into the gadget, after uninstalling Android.
Of course, you can simply buy a Windows phone in a store, but many users know firsthand that these smartphones have adopted not only the high demands of the computer OS of the same name, but also its numerous bugs.
Therefore, to get acquainted with the colorful interface and to become more familiar with the functionality of Microsoft developments, it is more advisable to use your usual and reliable Android smartphone.
Many users are attracted by the relatively new OS for mobile devices, its unusual tiled interface and richness of bright colors.
 Next, we’ll look at how to install this system on an Android background. And if the owner gets bored with Windows over time, then it will not be difficult for him to switch again to reliable and functional Android.
Method 1: Using an emulator
This is the simplest method, since there is no need to search for the necessary software on Internet resources and flash the gadget.
Almost all that is required from the user is to visit the usual Google Play Market and follow these steps:
- In the search line of the “market” type “Launcher Windows Phone 8”;
- In the list of applications that appears, find and click on the above launcher;
- Install the program and run it;
- Ready.
After installing the application, the Windows Background 8 splash screen will be displayed. All the most popular functions to use will appear on the display of your mobile device: calls, short messages, contacts, browser, calendar, alarm clock, Facebook, etc.
Description of some of the features received by the owner of the device with the new shell
Here the user can customize pages at their discretion. It can adjust the colors and sizes of tiles, and set any images as the background. On the main page, you can adjust the transparency of the icons.
The use of various widgets is available, for example, weather forecast, etc. The function of adding pages and moving between created program shortcut windows is also conveniently implemented.
If you move from the main window to the right one, icons will appear. The user can change their location as it suits him (by default they are arranged in alphabetical order). You can hide some shortcuts, for example, to access a Sberbank card.
It should be noted that even the lock screen will be exactly the same as in Windows Phone, but it can be easily adjusted, so the smartphone owner can choose the most convenient unlocking method for himself.
To do this, you just need to open “Settings” and go to the “System Wallpaper” section. Here the program will help you quickly find and install new ones from the Internet.
Unfortunately, a complete modification of the emulator is only available for money (about 200 rubles), but the owner of an Android device will provide himself with a colorful tiled interface and good functionality.
Method 2: flashing Android to Windows
If the owner of an Android device is thinking about how to reflash his device, then this procedure is somewhat more complicated and will require taking into account some important nuances.
Modern Windows for smartphones at Microsoft is designed for processors with x86 architecture.
The fact is that Android is mainly designed for ARM. If the user’s mobile device has x86 architecture, then you can start flashing it.
To do this, you will need to perform the following sequential steps:

Note: if the gadget does not have suitable software, then it is advisable to use the hub.
Then the OS is installed completely in the same way as on a computer. If the distribution does not contain the appropriate drivers, you will need to download them from the global network.
Many people are interested in the question of how to change one operating system from one operating system to another on a phone. This is possible using firmware. Consider such popular systems as Android and Windows Phone.
Making Android from Windows Phone
Data-lazy-type="image" data-src="http://androidkak.ru/wp-content/uploads/2016/08/windows-android.jpg" alt="windows-android" width="200" height="119" srcset="" data-srcset="http://androidkak.ru/wp-content/uploads/2016/08/windows-android..jpg 300w" sizes="(max-width: 200px) 100vw, 200px">
!}
 First, take care to create a backup copy of your device. This can be done by a function on your phone or a special program (for example, Titanium Bekap). If something goes wrong or you want to return everything back, then such a copy will help you do it without any problems. Also, a backup copy will help you install on a ready-made flashed smartphone to return all your important documents, photos, images, videos and other files. In order to check whether there are backups in the phone’s memory, you need to go to the phone’s settings, to the “Backups” tab.
There are a lot of phone models running Windows OS, but the firmware principle is the same. Firmware can be installed in two ways: installing Android on a memory card and launching it directly from the Windows system, and installing Android into the phone's memory.
The main files that are present in the firmware program:
- Initrd.gz – file system. Used to run Android from a flash drive.
- Haret.exe is a system file that loads the entire Android platform.
- Zimage is the kernel for Android.
- Default.txt – boot script.
- androidinstall.tar – file system.
- androidupdate.tar – file for updating the Android system.
Launch of a new system with Windows Phone CP
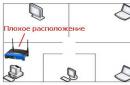
With this method, all Android system folders are registered in one of the root folders of the Windows Phone memory card. The folder can be anything. Example of a system path: Memory card /OCA. Particular attention should be paid to the default.txt file and its contents. It contains all the information for the normal launch of the new operating system.
When the Haret.exe file is launched, the smartphone loads the operating system again, thanks to the parameters of the default.txt file. this means that even though the OS is copied to a removable drive, using native Windows is only possible after a backup (restoring the state of the phone to a certain point - when the save was created). Possible problems with this installation format are restarts and crashes.
Starting a new system from Windows Phone memory
The file that is installed in the smartphone’s memory is .nbh. For our case, it should be called polaimg-panel1-320-17-06-10.nbh, where each part has its own meaning. The first word is the type of smartphone (manufacturer), the second is the model, the first digit is the screen resolution, the last three digits are the release date of this file. We select the firmware version ourselves depending on personal preferences.
- Using special programs, we obtain root rights to the smartphone. This can be done using programs such as: Framaroot, Root Genius, iRoot, RomasterSy and others.
- Download the utility necessary for flashing the firmware. It is different for each phone and tablet model. If we take the most common ones, then for HTC these are Custom programs.
- We format the memory card using a program designed for this - Fat 32. It is better to take the memory card class 10, so that there are no problems in the future. We create a folder on it, which we call andboot. From the firmware, select the file androidinstall.tar and, if available, androidupdate.tar and place them in the folder created on the flash drive.
- Connect the device to the computer using a USB cable without a memory card! On the computer, create a folder with any name and transfer the Custom program and the .nbh file into it.
- We launch the program from the Custom RUU folder and follow the instructions that appear on the screen. The last thing you need to do is click the button labeled Update and wait for the progress to finish. Then it restarts and hangs.
- We insert the previously prepared memory card into the device and simultaneously press the volume “-” button and the power off button (turn it on in soft reboot mode). We wait until the message “Hold down Volume Up or DPad center to launch installer” appears on the smartphone screen. As soon as we see it on the screen, press the center of the joystick button (or the “+” button on the volume). The device will go to the installation menu for the new operating system.
- In the menu that appears, you need to select Sys on NAND/Data on NAND. Below you need to select Install System and wait until the system is installed. If the androidupdate.tar file was moved to the memory card, then select Install Update and wait to return to the main menu. Next you need to click on Fix Permissions and wait.
- Next, we reboot the device again in soft reboot mode. After this, the device can boot for quite a long time (from 5 to 20 minutes), everything is ready!
In February 2015, Microsoft officially announced the release of a new version of its mobile operating system - Windows 10. To date, the new “OS” has already received several global updates.
However, with each major addition, more and more old devices become outsiders and stop receiving official support from developers.
Official installation of Windows 10 Mobile
Officially, this OS can only be installed on a limited list of smartphones with an earlier version of the operating system. However, in practice, the list of gadgets that can accommodate version 10 of Windows is much wider. Not only Nokia Lumia owners can rejoice, but also users of devices with a different operating system, for example, Android.
Windows Phone models that will receive the official update to Windows 10 Mobile:
- Alcatel OneTouch Fierce XL,
- BLU Win HD LTE X150Q,
- Lumia 430
- Lumia 435
- Lumia 532,
- Lumia 535
- Lumia 540
- Lumia 550
- Lumia 635 (1GB),
- Lumia 636 (1GB),
- Lumia 638 (1GB),
- Lumia 640
- Lumia 640 XL,
- Lumia 650
- Lumia 730,
- Lumia 735
- Lumia 830,
- Lumia 930
- Lumia 950
- Lumia 950 XL,
- Lumia 1520,
- MCJ Madosma Q501,
- Xiaomi Mi4.
If your device is on this list, updating to a new OS version will not be difficult. However, it is worth approaching this issue carefully.
Video: Updating your Lumia phone to Windows 10 Mobile
Unofficial installation of Windows 10 Mobile on Lumia
If your device is no longer receiving official updates, you can still update it to the latest version of the OS. This method is relevant for the following models:
- Lumia 520,
- Lumia 525
- Lumia 620
- Lumia 625
- Lumia 630
- Lumia 635 (512 MB),
- Lumia 720
- Lumia 820
- Lumia 920
- Lumia 925
- Lumia 1020,
- Lumia 1320.
The new version of Windows is not optimized for these models. You take full responsibility for the incorrect operation of the system.
- Do Interop Unlock (unlocks installation of applications directly from the computer). To do this, install the Interop Tools application: you can easily find it in the Microsoft store. Launch the application and select This Device. Open the program menu, scroll down and go to the Interop Unlock section. In this section, enable the Restore NDTKSvc option.
In the Interop Unlock section, enable the Restore NDTKSvc function
- Restart your smartphone.
- Launch Interop Tools again, select This Device, go to the Interop Unlock tab. Activate the Interop/Cap Unlock and New Capability Engine Unlock checkboxes. The third checkbox - Full Filesystem Access - is intended to enable full access to the file system. Don't touch it unnecessarily.
Activate the checkboxes for Interop/Cap Unlock and New Capability Engine Unlock
- Restart your smartphone.
- Turn off automatic app updates in your store settings. To do this, open “Settings” and in the “Update” section next to the “Update applications automatically” line, slide the lever to the “Off” position.
You can disable automatic updates in the “Store”
- Go to Interop Tools again, select the This Device section and open Registry Browser.
- Navigate to the following branch: HKEY_LOCAL_MACHINE\SYSTEM\Platform\DeviceTargetingInfo.
You can install Windows 10 Mobile on unsupported Lumia using the Interop Tools application
- Record or take screenshots of the PhoneManufacturer, PhoneManufacturerModelName, PhoneModelName, and PhoneHardwareVariant values.
- Change your values to new ones. For example, for a Lumia 950 XL device with two SIM cards, the changed values will look like this:
- PhoneManufacturerModelName: RM-1116_11258;
- PhoneModelName: Lumia 950 XL Dual SIM;
- PhoneHardwareVariant: RM-1116.
- And for a device with one SIM card, change the values to the following:
- PhoneManufacturer: MicrosoftMDG;
- PhoneManufacturerModelName: RM-1085_11302;
- PhoneModelName: Lumia 950 XL;
- PhoneHardwareVariant: RM-1085.
- Restart your smartphone.
- Go to Settings - Update & Security - Insider Program and enable receiving preview builds. Your smartphone may need to be restarted. After rebooting, make sure the Fast circle is selected.
- Check for updates in Settings - Update & Security - Phone Update.
- Install the latest available build.
Video: Installing Windows 10 Mobile on unsupported Lumia
Installing Windows 10 on Android
Before a full reinstallation of the operating system, it is strongly recommended to determine the tasks that the updated device should perform:
If you still need to have a full-fledged “ten” on board, before installing a new OS, make sure that your device has enough space for a new heavy system. Pay attention to the characteristics of the device's processor. Windows can be installed only on processors with ARM architecture (does not support Windows 7) and i386 (supports Windows 7 and higher).
Now let's move on to the installation:
- Download the sdl.zip archive and the special sdlapp program in .apk format.
- Install the application on your smartphone and extract the archive data to the SDL folder.
- Copy the same directory to the system image file (usually c.img).
- Run the installation utility and wait until the process completes.
Video: how to install Windows on Android
If your smartphone receives official updates, there will be no problems installing the new OS version. Users of earlier Lumia models will also be able to update their smartphone without any problems. The situation is much more deplorable for Android users, because their smartphone is simply not designed to install Windows, which means that if a new OS is forcibly installed, the owner of the phone runs the risk of getting a fashionable, but very useless “brick.”
(6
ratings)
The main disadvantage of using devices with the Windows Phone operating system is the rather limited set of mobile applications. If the various games and utilities available for Android smartphones have long won the recognition of users, then The assortment offered to owners of devices with a tiled OS still raises many complaints.
In connection with this situation, many people have a question about how to install Android on Windows Phone devices in order to gain access to more advanced features. Currently There are two ways to achieve this goal:
- flashing the device to initially boot the Android OS;
- using special tools that allow you to install and run Android applications directly in the Windows environment.
How to install Android on your smartphone with Windows Background?
There are two main methods for using firmware:
- direct installation of the Android OS into the memory of the mobile device and launch it when turned on;
- placement of the firmware on an external memory card and activation from the Windows environment.
Will be useful
Regardless of the chosen option, further return to loading the standard operating system is possible only when restoring data from a backup copy. Therefore, before starting the transition to Android, we make sure to back up your information. This procedure is performed using built-in Windows system functions or external utilities (you can use Titanium Backup or another similar program).

Next, you need to download and find the firmware version intended for installation on a specific model of mobile device. The name of the main operating system file that will be installed in the smartphone memory, has the form “Manufacturer-Model-Resolution-Day-Month-Year.NBH”, that is, first the brand and model of the device are indicated (in text), then the maximum screen resolution (in numbers) and the release date of this assembly.
In addition to the .NBH file, the firmware contains the following main elements:
- androidinstall.tar – OS file system manager;
- androidupdate.tar – Android update file;
- Initrd.gz. – responsible for loading the OS located on external media (activation from an SD card);
- Haret.exe – initiates the system startup process;
- Zimage – directly the core of the Android OS;
- Default.txt is a boot script that specifies the main system startup parameters.
The method is the simplest, but is fraught with frequent freezes and spontaneous restarts of the device.
note
Although booting is done from external media, returning to normal operation of “native” Windows is possible only after restoring from a backup copy; the standard “turn off/on” will not help here.
To activate Android from external media create any directory in the root of the SD card, copy all the firmware files there and run “Haret.exe”.
Preparation and process of firmware
The technology for installing Android on Windows devices is identical for most modifications and involves the following steps:
- We get root rights (unlimited access) to the smartphone. For this, specialized applications are used (iRoot, FramaRoot and others).
- Download and install the service program used to install the firmware. Each manufacturer's devices have their own software. For example, firmware on HTC smartphones is done using the Custom utility.
- We format the SD card for the FAT32 file system. It is recommended to use Class 10 memory cards to reduce the likelihood of problems and failures in the future.
- On the formatted card, create the “Andboot” directory, into which we copy two files from the firmware set: androidupdate.tar and androidinstall.tar. After this, be sure to remove the external drive from the smartphone!
- We connect the mobile device (without a card!) to the personal computer using a USB cable and transfer the installation program (the aforementioned Custom) and the system file with the .NBH extension to the hard drive.
- Launch Custom on your PC and simply follow the instructions that appear on the screen. The last step is to click the “Update” button (in the English interface – “Update”), after which the smartphone will complete the installation process and automatically reboot.
- However, the device will not be able to complete the restart process and will freeze. At this moment, insert the memory card removed in the previous steps, after which we simultaneously press the buttons to turn on the smartphone and lower the volume.
- The message “Hold down Volume Up or DPad center to launch installer” should appear on the screen. We fulfill the requirement: press the volume rocker or the center button of the joystick (if available).
- The installation mode for a new operating system is activated. In the menu that opens, select “Sys on NAND/Data on NAND” and run “Install System”. If your firmware package included an update file, then after completing the installation process of the system itself, click on “Install Update”.
- When all installation processes are completed, click on “Fix Permissions”, after which we send the smartphone to soft storage